Before proceeding complete the steps in the D2L Announcement 'Core Website Files'.
This positions the files and folders needed to begin creating your course website.
Before proceeding you MUST have OneDrive for Business (OneDrive - MNSCU) installed and configured.
Install it per the resources in the Assignment Overview.
If you are not familiar with Windows File Explorer please review this LinkedIn Learning course, ' Windows 10: Organizing Files and Folders '
Remember-no spaces in file or folder names-only use 'a-Z', '0-9' and the underscore character.
Windows File Explorer will organize the files and folders needed to complete coursework.
Using OneDrive for Business provides an automated backup of these files-for this class and others.
In this class File Explorer is used-
1-To create folder structures that organize your work, such as screenshots to prove you have completed Exercises.
These items are stored on your laptop, and One Drive for Business automates the backup process to the cloud.
2-To create a local repository for your course website, which will be done in Project01.
These instructions reduce the chances of losing any class work.
Use Windows 'File Explorer' to create a specific folder structure under OneDrive - MNSCU
- Create a folder with this Class name
- Create a subfolder with this Assignment name. The path will be: '
When done with the Exercise 1 and 2 screenshots, your folder will look similar to the image below, but with the appropriate class:
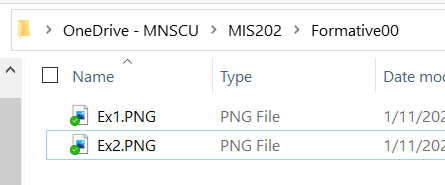 Folder with screenshots for first two Exercises
Note: clicking an image provides larger version in separate tab
Use the Snipping Tool to make a screenshot of File Explorer, showing the Class folder containing the Formative00 subfolder just created.
(25) 1. Save the screenshot as 'Ex1A' in the folder just created which has the path:
'
The screenshot file can be .jpg, .png or other appropriate image file format.
Screenshot Ex1A
Close the loop- login to OneDrive in the cloud to ensure that your files and folders are being synchronized with your laptop (and phone?).
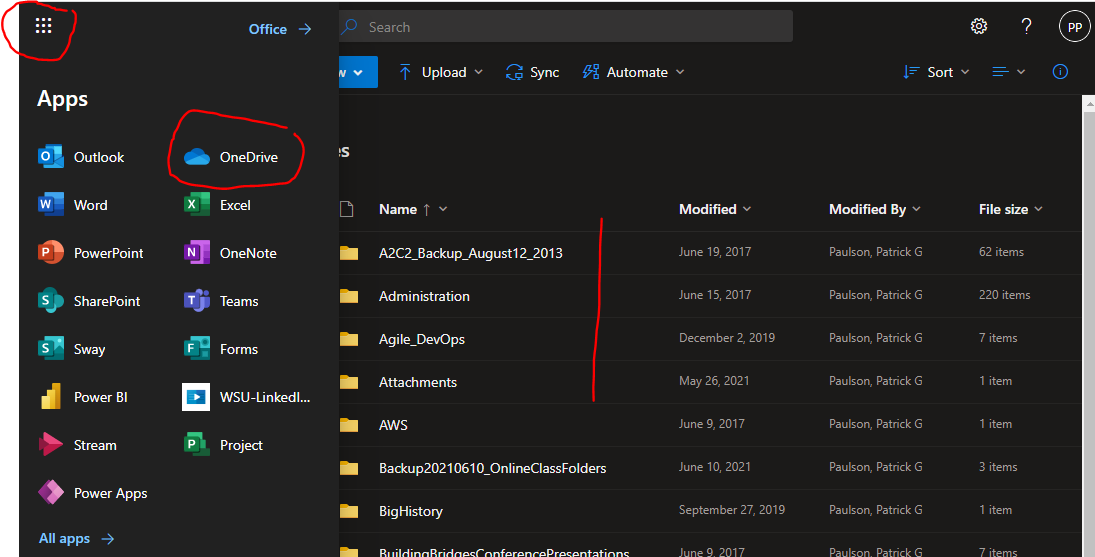
- Open a browser to Office 365
- Log into Office 365 and access your account.
- Click the 'App Launcher' button in the top left corner, then click on 'OneDrive' .
- Check to make sure that the folder structure in OneDrive is exactly the same as the folder structure in your File Explorer OneDrive.
If not, time to start troubleshooting, you can have any number of problems.
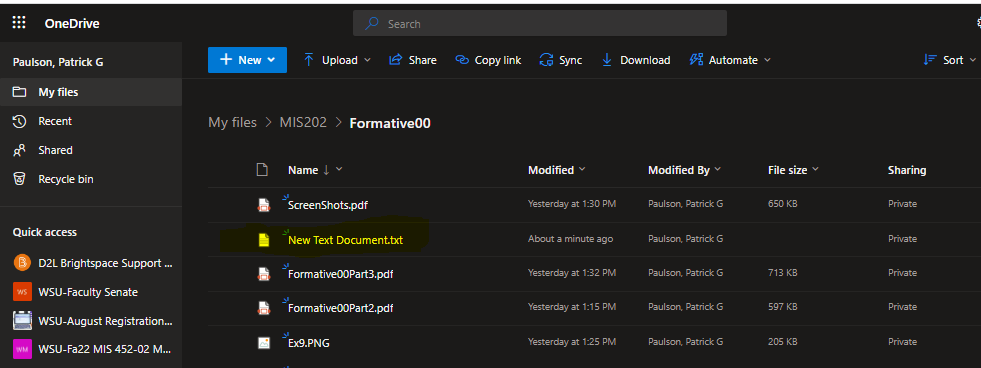
- As a check, use NotePad and create a new file that contains the following text:
I love OneDrive
Save this file as 'ReadMe.txt' to the OneDrive Formative00 folder on your laptop for this class
After creating
the ReadMe.txt file, open the browser to the OneDrive Formative00 folder for this class, and in a few minutes the file should appear.
If not it is time to begin trouble shooting.
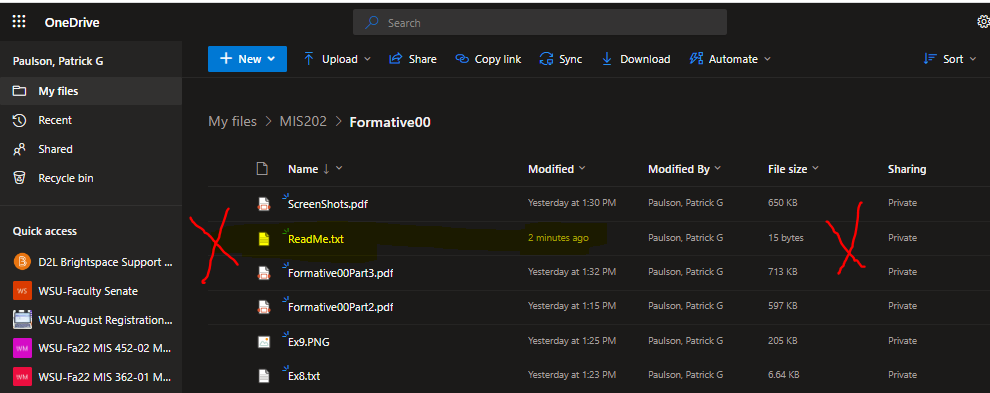
Use the Snipping Tool to make a screenshot of this file in OneDrive in your browser.
It will first look like this:
Then it will rename the file like this:
(25) 7. Save the screenshot as "Ex1B" in your '
Screenshot Ex1B
Examine the top of this page, and notice that the First Name field contains MyFirstName, the Last Name field contains MyLastName, the StarID field contains MyStarID, and the Email field contains MyStarID@go.minnstate.edu.
You will enter your first name, last name and StarID into a constants.js file to personalize your website and all other assignments for this class.
This demonstrates the power of coding-to reduce errors, save time and add functionality.
Java Script and VB Script are used to automate and facilitate this course in the same manner as other software powering the web, ecommerce, everything.
Note: if you are off-campus you will need to connect to the WSU VPN per the appropriate exercise, and then map your network drives.
Once you are connected to the WSU network you can use File Explorer to navigate to different drives such as
C: which is the SSD-Solid State Drive in your laptop
R: which is your personal network storage space-but may soon be replaced by OneDrive for Business
T: which is a network drive that contains folders for any of your courses which have requested network storage (like this one)
- Using File Explorer, navigate to the T: drive for this class, and find the folder with your WSU network username.
- Inside this folder find the file named constants.js
- Right-click this file and 'Open With' Notepad, carefully entering your first name, last name and StarID in the places indicated.
Be careful not to delete any punctuation marks.
- Save this file in the same location.
- Refresh your browser ( Ctrl + F5 ), and check to make sure your name appears correctly at the top of this assignment.
- If your first name, last name or StarID is incorrect, make sure to fix it-the proper submission of all your work in this course depends on it.
- If you still see 'MyFirstName' or 'default first name' instead of your first name on this page, it is time to begin troubleshooting.
- Once you are satisfied that your name and StarID are correct in your constants.js file, you should browse to your website Home Page and submit your attendance.
- Check the confirmation message to make sure all information is correct.
Bring any error to the professor's or Teaching Assistant's attention.
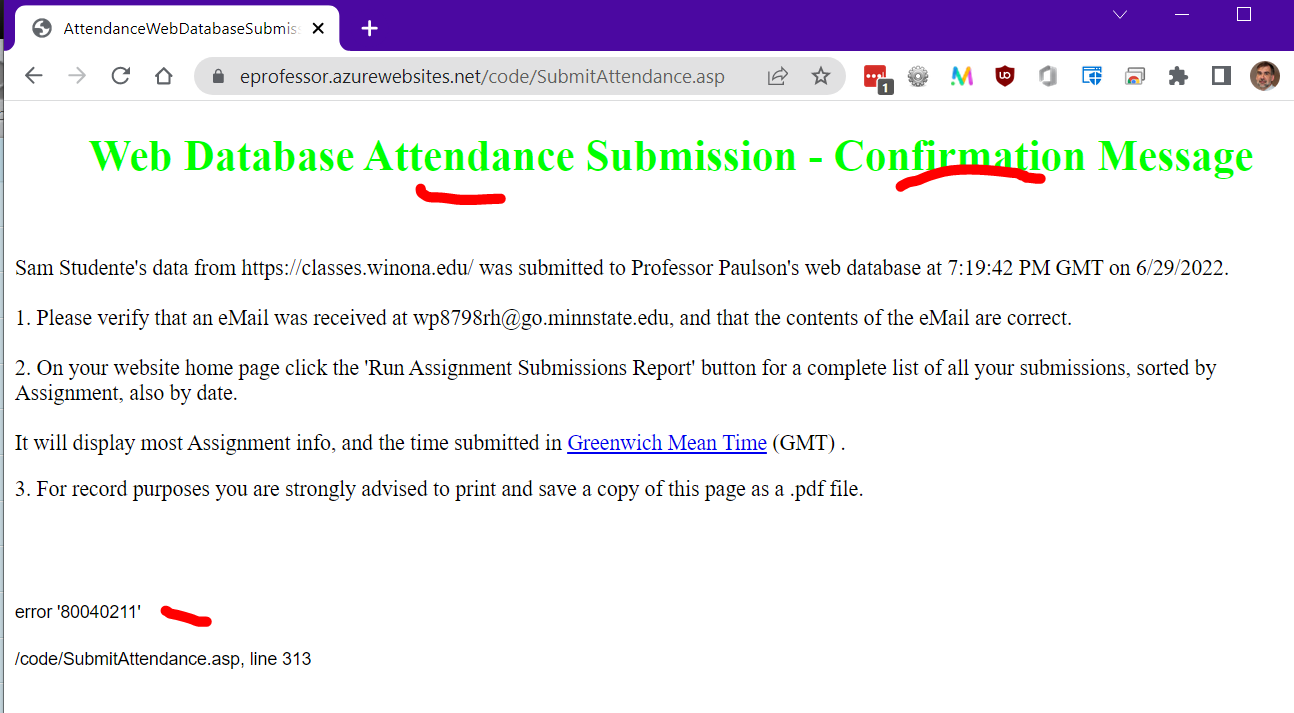
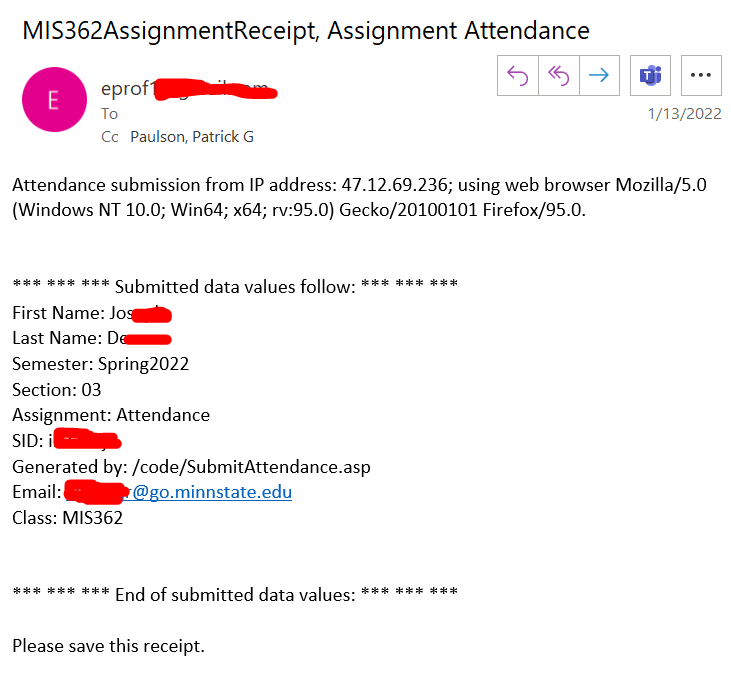
- Check your email to verify that you also received a confirming email.
It will look something like this:
Use the Snipping Tool to make a screenshot of File Explorer with the Preview Pane active, showing the constants.js file in the T: drive folder that you just updated using NotePad.
It will look like this:
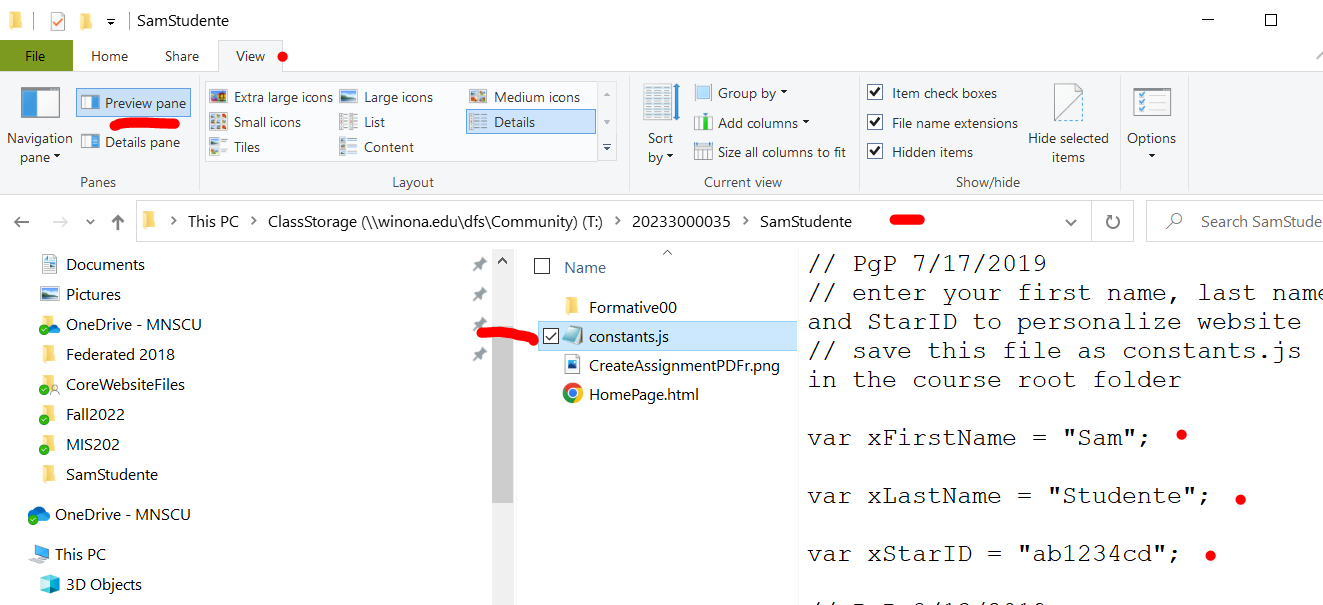
constants.js File
(50) 2. Save the screenshot as "Ex2" in your '
It can be a .jpg, .png or other appropriate image file format.
Screenshot Ex2
Ultrabooks are being built with fewer, but increasingly functional ports.
The WSU lease models are equipped with Thunderbolt (USB Type-C) ports that can provide connections to 2 external monitors, a wired network, and power-among other things.
As a result, you can plug your laptop into a USB Type-C dock with one cable and begin to work.
Note: after plugging your laptop into the USB Type-C dock, make sure that the 'Wired' connection icon is visible in the lower right 'Task Tray'.
 Wired Network Connection
If the wired network icon does not appear when connected to a Somsen 301 USB Type-C dock, contact a TA or the professor for assistance-there is something wrong with your laptop, it may need a driver update, or more. See the very end of this Assignment for more information.
Note: Professor Paulson strongly recommends that before every class in Somsen 301 you connect your laptop to the HP USB-C dock and RESTART your compuer, applying updates as required. This will minimize computer problems. You have been warned!!!
Why are additional monitors necessary? Some reasons:
- Conveniently run multiple software applications on separate monitors
- Easily copy and paste data between open applications
- Participate in a web conference while also running other applications
- Watch class recordings while also running other applications
- Be able to keep Outlook open in one monitor at all times
To setup, use and disconnect an external monitor from your laptop follow the instructions below.
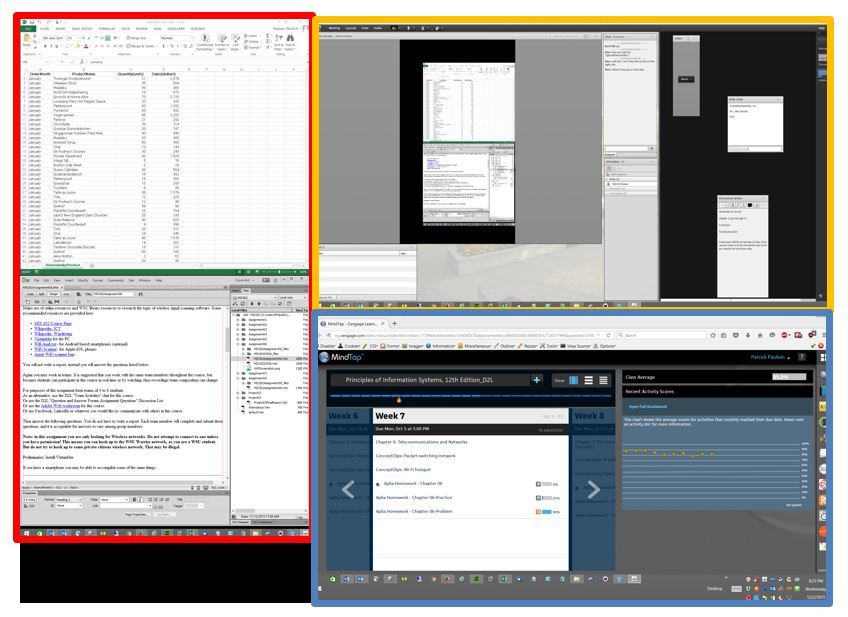
Three monitors, outlined in red, orange and blue.
When using external monitors you can have a 'public' and 'private' display. The primary laptop display can be private, viewable only by the user. The external monitors can be public, viewed by others. This allows the user to view class notes, email, Desire2Learn information privately on their laptop. The user can publicly share a website or spreadsheet.
- Connect the USB-Type C cable to the appropriate port, depending on your laptop model. See the teacher or TA if you need assistance.
- Right click a blank area of your desktop and choose 'Display settings', the Settings dialog box will appear.
- Refer to the figure below and adjust the settings to position and orient your monitors correctly. You may need to click the 'Apply' button several times during this process.
Note that:
- If three monitors do not appear, click the 'Detect' button.
- Under 'Multiple displays' all three should be set to 'Extend desktop to this display'
- Click the 'Identify' button to find the number of each monitor.
- "Monitor 1" will be your laptop display
- Make sure when Monitor 1 is selected (monitor icon highlighted in blue) that 'Make this my main display' box is checked.
- "Monitor 2" will be your external landscape display, and should be positioned above your laptop.
- "Monitor 3" will be your external portrait display, and should be positioned to the left of your laptop
- In the graphic, select your portrait monitor, number 3.
- Under 'Orientation' select 'Portrait'.
- Click 'Apply' in the lower right.
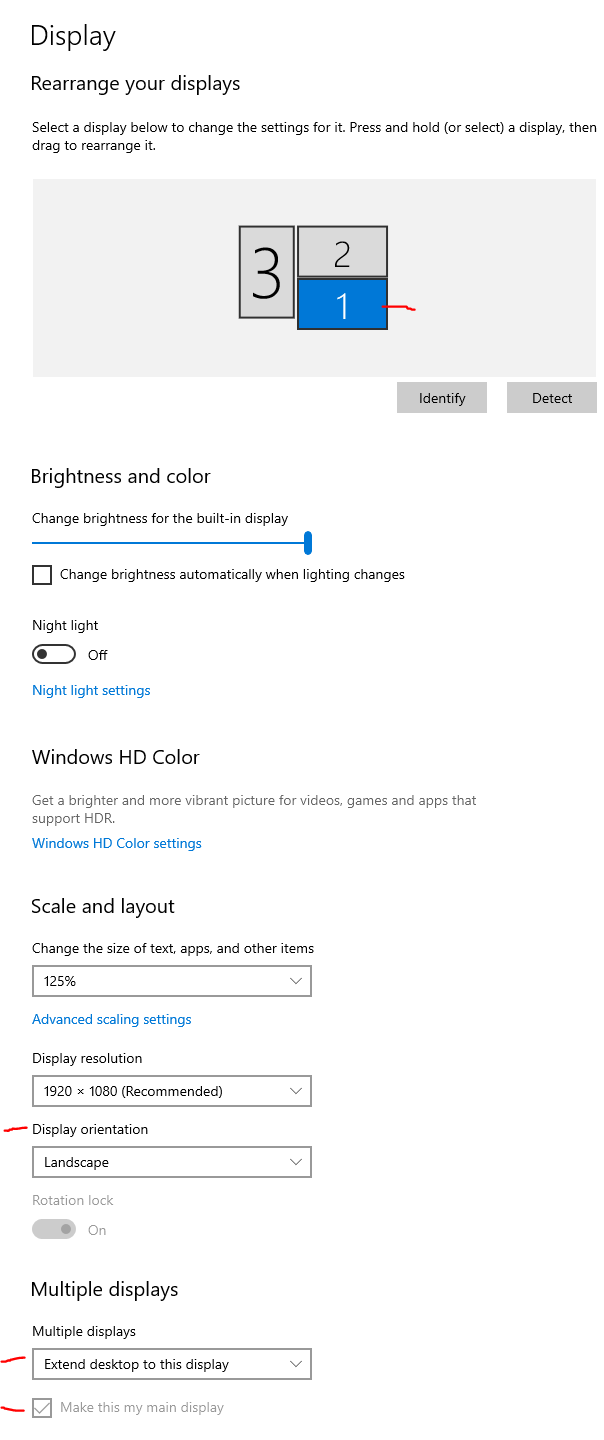
Display Setting Controls
- As necessary drag the monitors into the correct physical location as depicted in the 'Select and Arrange Displays' section at the top of the Settings dialog box. Then click 'Apply' to accept the changes. You may need to repeat this procedure.
- To test that you have configured your monitors correctly you should be able to move the Settings dialog box between all three monitors seamlessly by clicking and dragging on the dialog box title bar. Repeat the above steps as necessary until you can do this.
- Close the dialog box.
Display content on all three monitors, such as websites.
(25) 3. Use the Snipping Tool in 'Full-screen Snip' Mode to make a screenshot of all three monitors.
Save the screenshot as "Ex3" in your '
Screenshot Ex3
In the next two exercises you will install software on your computer. This is different than installing software on your phone, as it involves two processes-downloading (retrieving the necessary files) and installation (running a program that asks you to choose certain program settings).
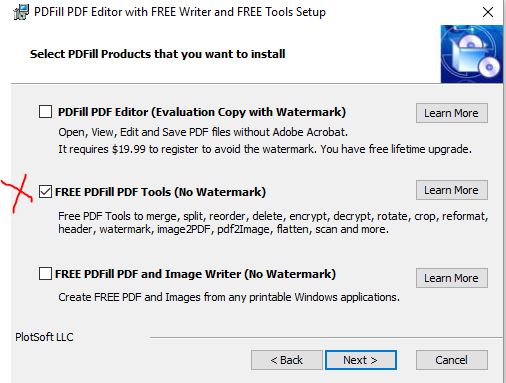
PDFill combines .pdf files that you will be creating during this course into one file.
Download a copy of PDFill.exe from Professor Paulson's OneDrive - MNSCU 'ReadOnly' folder.
Double-click PDFill.exe to begin the installation process.
- Install PDFill, but select only "FREE PDFill PDF Tools (No Watermark)" option
After installing PDFill open the Control Panel.
In the upper right corner click the drop-down arrow and select 'Small Icons'.
Make sure you are at 'Control Panel>All Control Panel Items>Programs and Features'
Make the window big enough to view all the icons.
(25) 4. With the Snipping Tool make a screenshot of the Control Panel window showing the PDFill icon.
Use the Yellow Highlighter Tool to highlight the 'PDFill' software icon.
Save the screenshot as "Ex4" in your '
Screenshot Ex4
You will create one .pdf (portable document format) file from the screenshots taken above.
Two methods of combining screenshots are presented below.
Choose whichever method works for you.
You can switch between methods at any time.
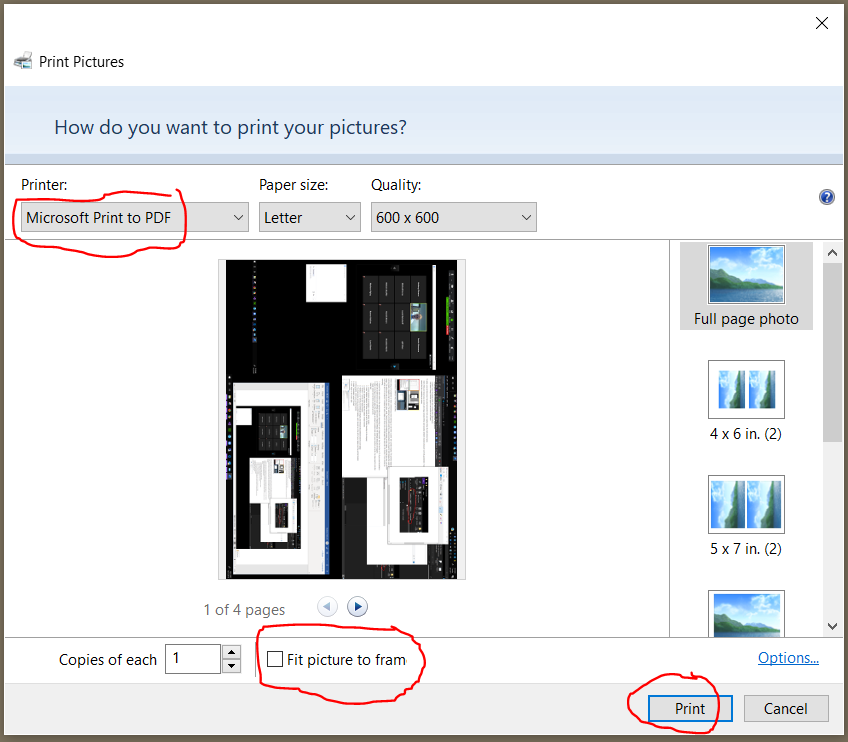
Make sure you have Windows 10 installed, and you have the option 'Microsoft Print to PDF' in the Print Dialog Box.
If not, contact a TA or the professor.
 Print dialog box
PDF Screenshot Method 1
About August 2022 'Print Pictures with Microsoft Print to PDF' (Method 2, below) became unstable so this is the preferred method.
- Open a blank Word Document
- Open 'File Explorer' and navigate to the folder containing your screenshots:
- Select all the screenshot files and drag them into the Word Document
- In Word, select File>Print, then select 'Microsoft Print to PDF'
- Save the file as 'Formative00_Part1.pdf' to the folder:
PDF Screenshot Method 2
- Unstable, use with caution.
- Open File Explorer, navigate to your '
Make sure the screenshot files are properly named.
- Select all of the screenshots.
- Right Click and select 'Print' from the pop-up menu.
- In the bottom center of the 'Print Pictures' dialog box uncheck the box "Fit picture to frame"
- Click on 'Print' and save the file with the name "Formative00_Part1.pdf" in your '
- You have created a PDF file that contains all 4 screenshots. It is viewable in your Chrome browser, or using Adbobe Acrobat Reader.
Do not worry about the order of the screenshots, nor the rotation.
(25) 5. Upload your 'Formative00_Part1.pdf' file to the D2L 'Formative00_Part1' Assignment folder.
...
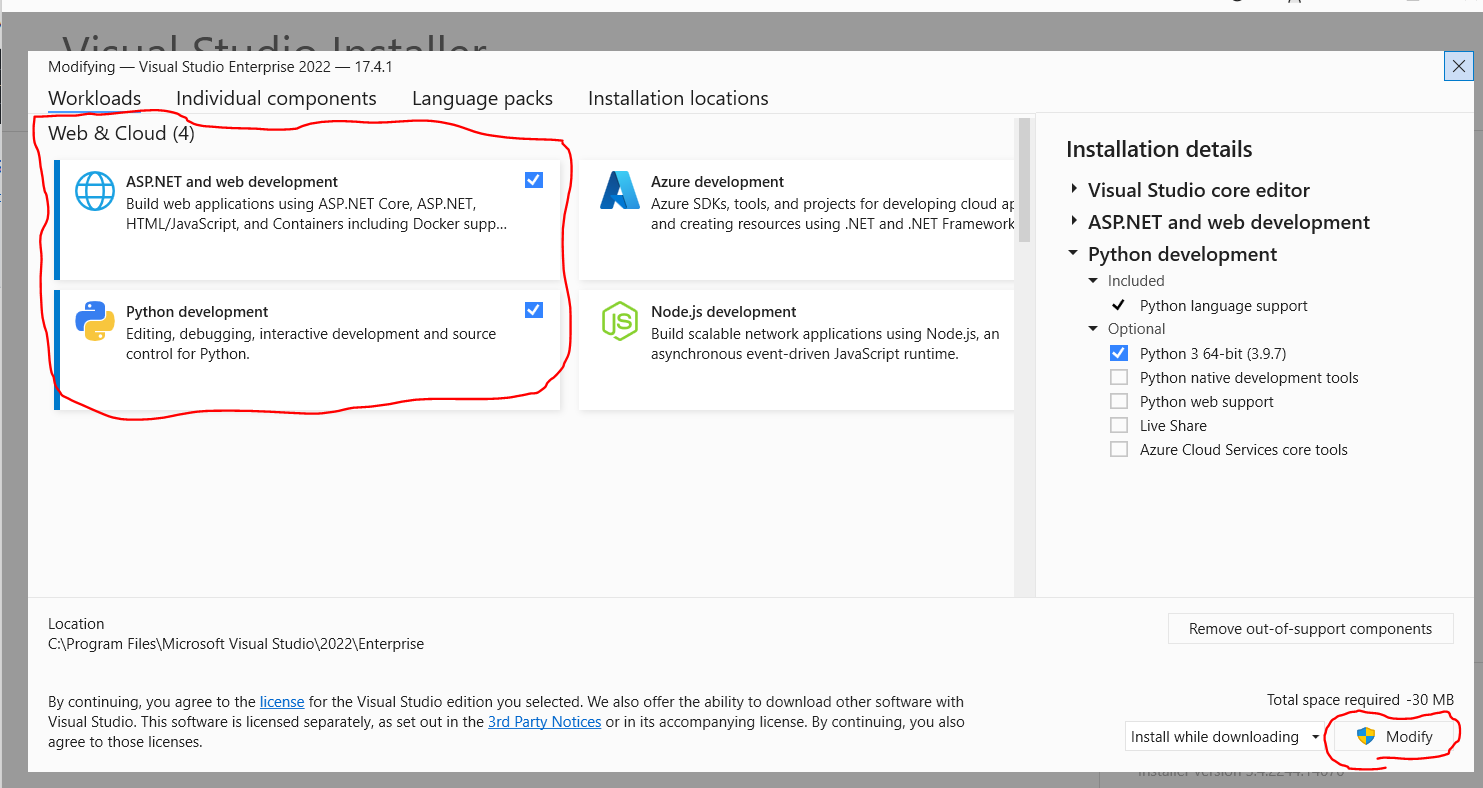
Download and install Visual Studio Enterprise 2022 to create and maintain a website, which is how you will complete course assignments.
Create a GitHub account which is used to obtain assignments and learn about version control.
Version control allows many programmers to collaborate on software development without needing to be co-located. It also allows a disciplined methodology to control this software.
- Get Visual Studio Enterprise, 64-bit, 2022 or later, from-Azure Dev Tools
Username is: StarID@go.minnstate.edu
- As Visual Studio downloads, retrieve and save your Product Key from the Azure Dev Tools website.
- Use NotePad and create a file named 'ProductKey.txt'
- Paste your Visual Studio Product Key into this file
(25) 6. Save this file as "ProductKey.txt" in your '
Install Visual Studio
- Please install the ASP.NET and web development, and the Python development modules.
If you forget to install these modules, you can choose Tools>Get Tools and Features...
The software is available at no charge to you.
The installation requires about 8GB of disk space.
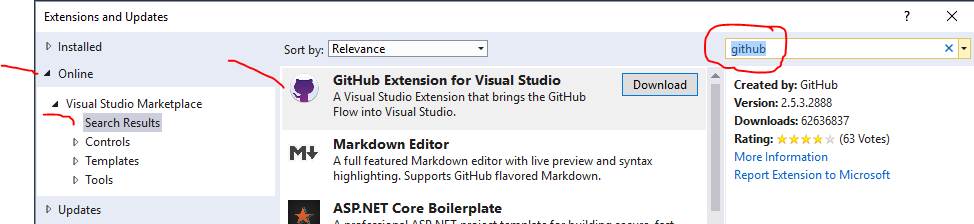
- If you are using VS 2022 or later you can skip this step, as the extension is already installed.
If you are still using VS2019 or earlier, you must install the Visual Studio GitHub Extension
From the menu select Extensions>Manage Extensions and search for 'GitHub Extension'.
- Visual Studio Settings
Open Visual Studio.
Under Tools>Options change the following settings are optimized for this class.
>Text Editor>All Languages; check 'Line numbers'
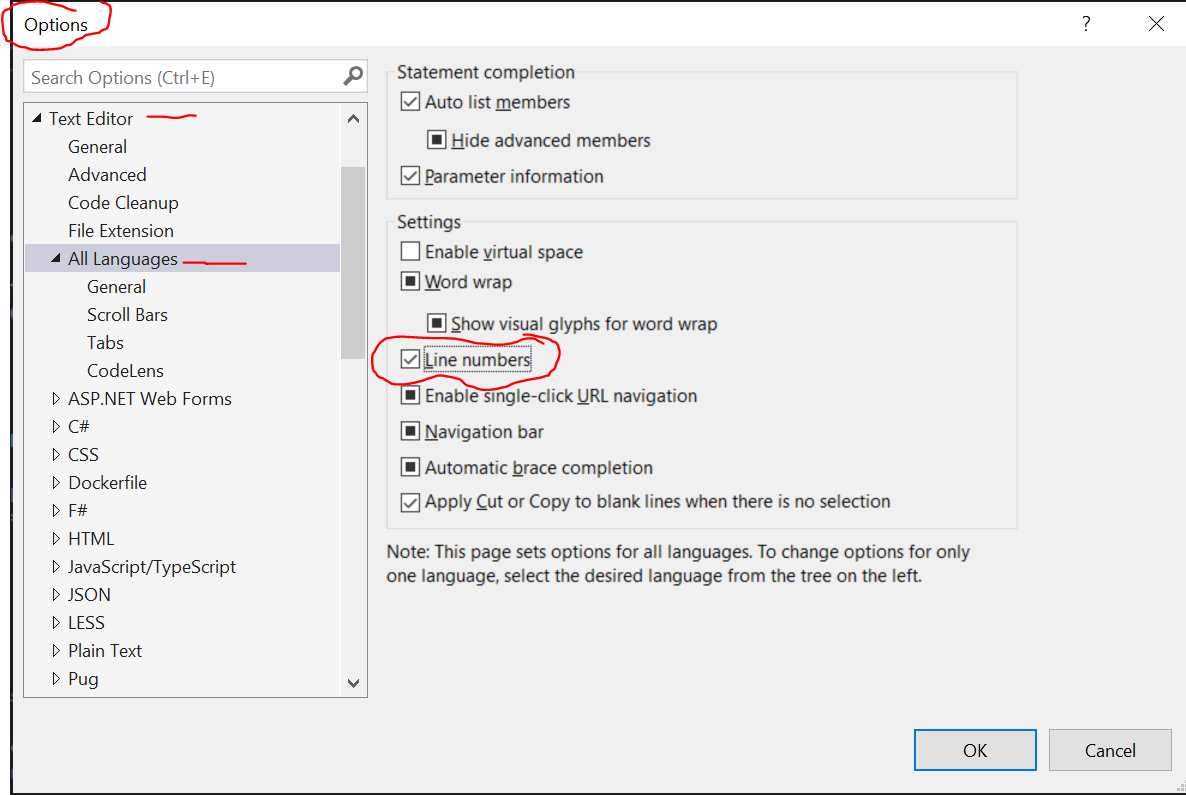 Check 'Line numbers'
Under >Web Forms Designer; check 'Legagcy Web Forms designer' and Start Pages in "Design View"
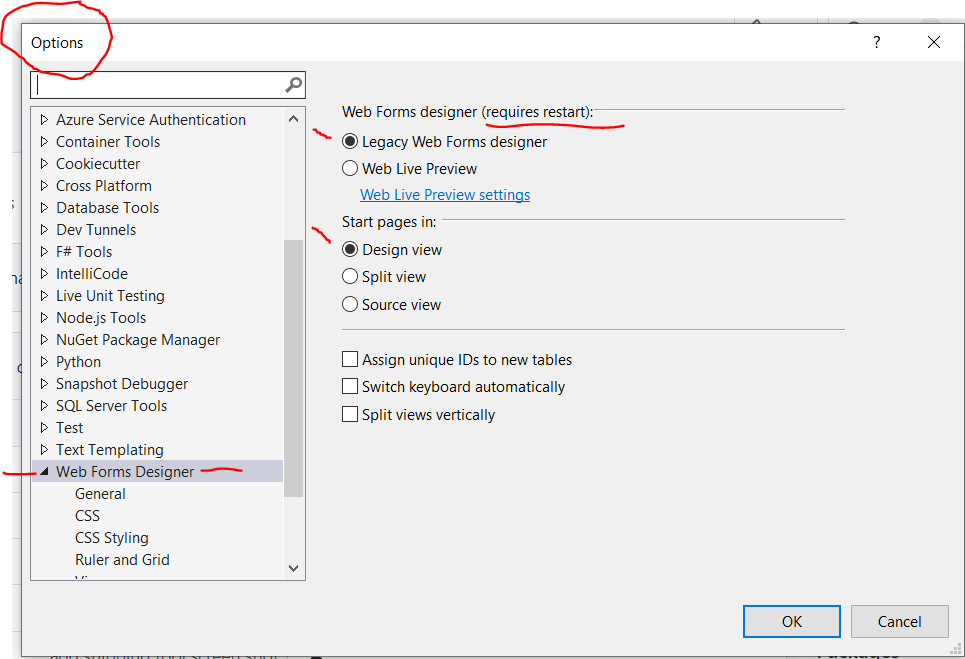 Enable 'Legacy Web Forms designer'
- Update Visual Studio as required.
Periodically updates are made available for Visual Studio.
You are notified by a red bell icon in the lower-right.
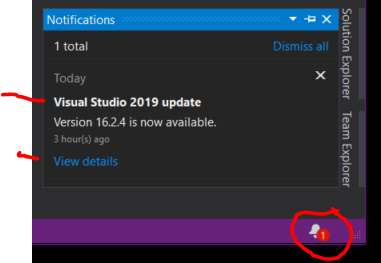 Install updates outside of class, as they can take time.
Note that you do not have to sign into your Minnstate account to use Visual Studio.
- Very Important-Register Visual Studio with your Product Key.
- From the Visual Studio menu choose Help > Register Visual Studio.
- On the right side of the window that appears there will be a link such as 'Apply Product Key', click that link and paste your Product Key into the dialog box that appears.
Follow any prompts.
- Use the Snipping Tool to make a screenshot of the window showing that your ProductKey was applied and save the screen shot:
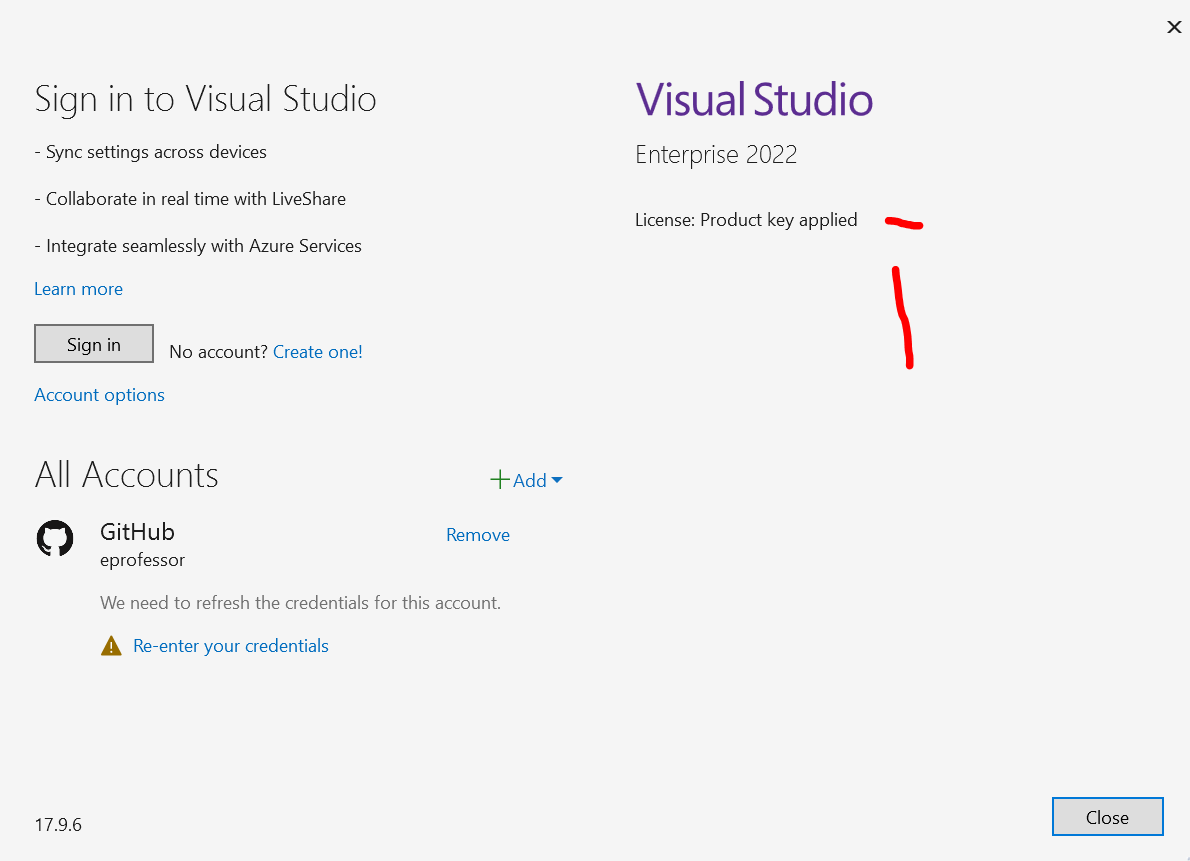
(25) 6.
Save this screenshot as "Ex5A" in your '
Screenshot Ex5A
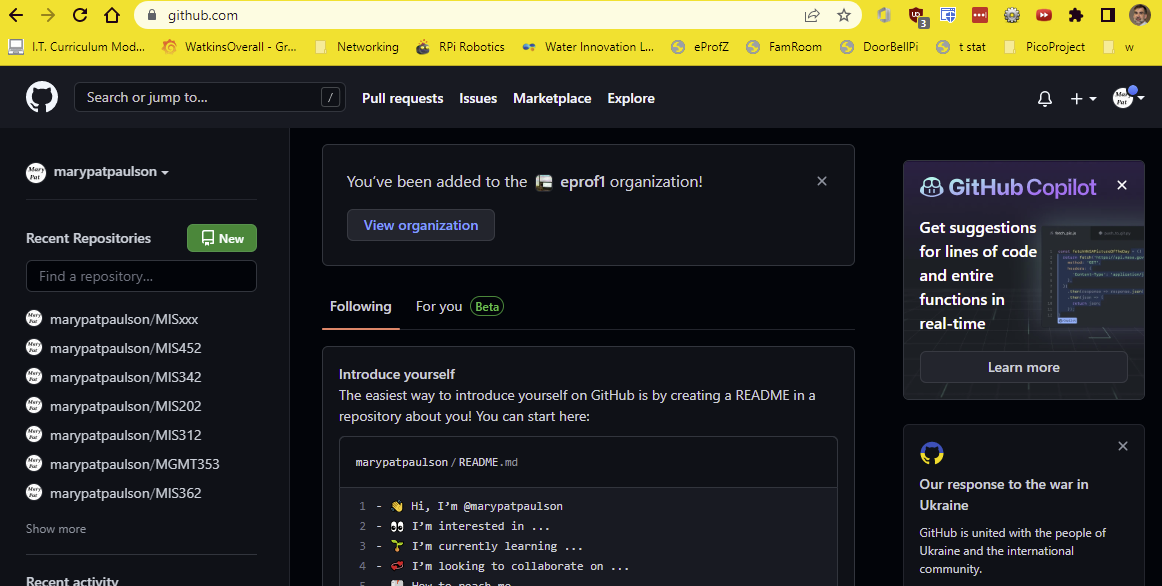
Create a GitHub account so that you will be able to obtain course assignments in the coming weeks.
- Open a browser to GitHub
- Log into GitHub and create an account, if you do not already have one.
After creating your GitHub account use File Explorer to navigate to the folder
Use the Snipping Tool to make a screenshot of your GitHub home page.
It will look like this:
 .
.
(25) 7. Save the screenshot as "Ex5B" in your '
Screenshot Ex5B
Download and install Git for Windows, so that Visual Studio can use git commands.

- Open a browser to Git for Windows
- Download the latest 64-bit version for Windows.
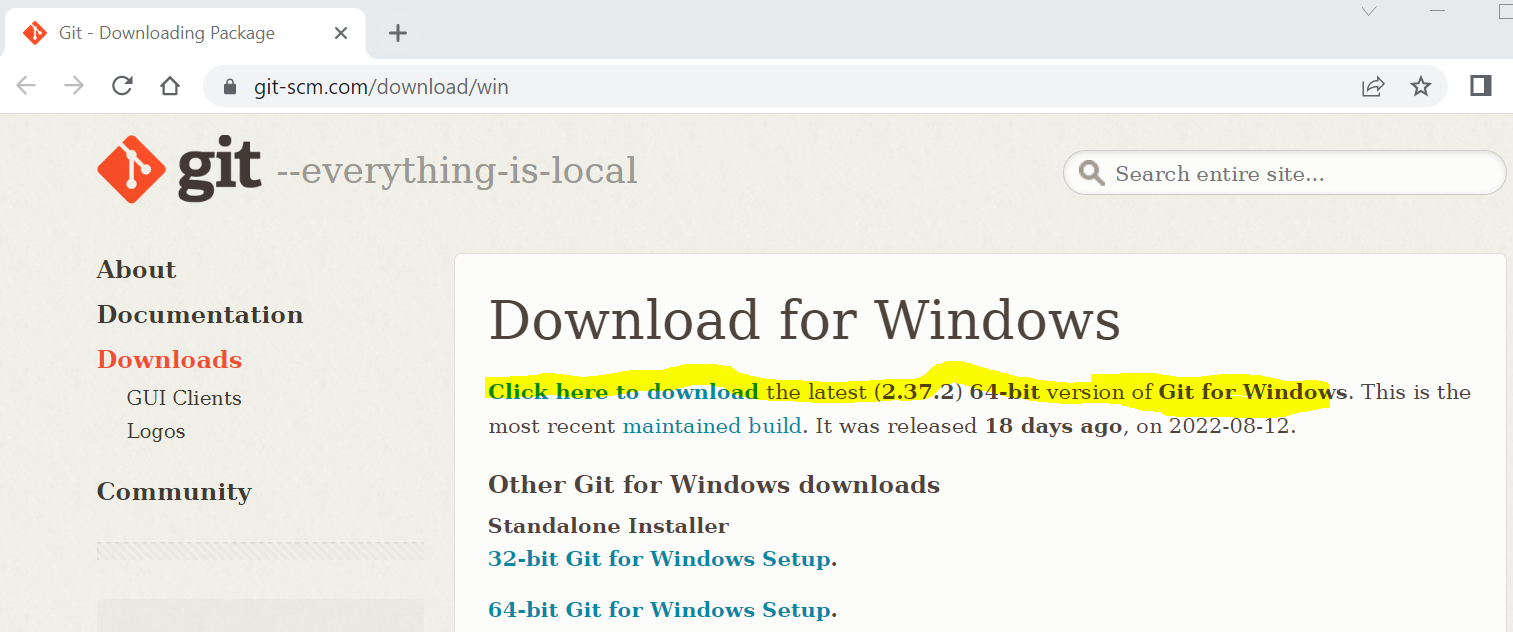
After installing Git for Windows, open the Control Panel to Programs and Features.
Use File Explorer to navigate to the folder
Use the Snipping Tool to make a screenshot showing that Git for Windows is installed.
(25) 8. Save the screenshot as "Ex5C" in your '
Screenshot Ex5C
- Browse to https://minnstate.zoom.us/ Click the 'Download Client' link at the bottom of the page to install the latest Zoom Client for meetings.
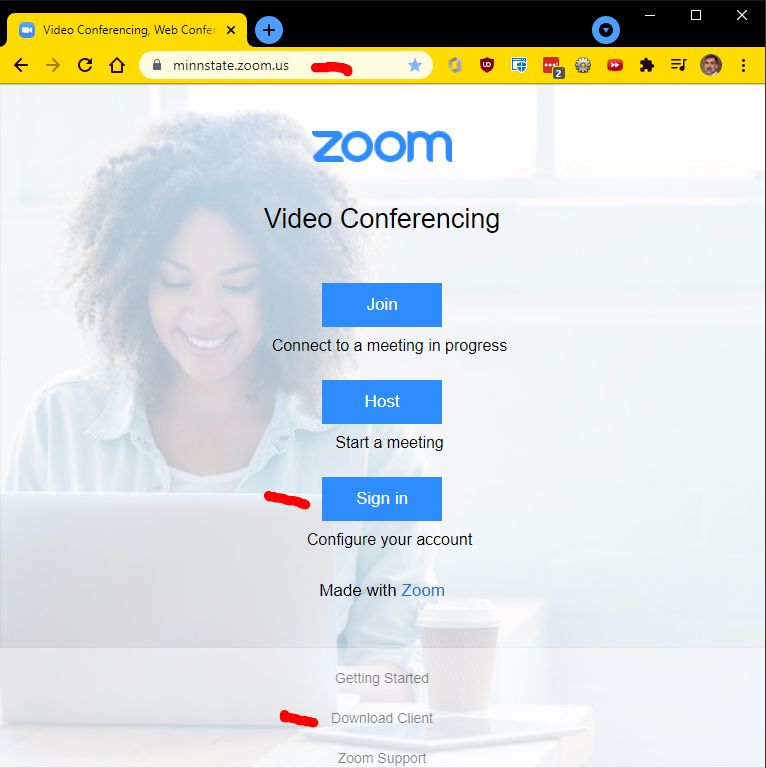
- Click the 'Sign in' button, your username is
StarID@go.minnstate.edu ; password is your WSU network password
Note: This sign in process authenticates you to the Minnstate Zoom system so that you do not show up as a 'Guest' in meetings.
By authenticating you ensure you will get credit for Attendance when the Professor runs the Zoom Attendance report.
- From the D2L 'Course Info' widget click on the url for the web conference.
eProfessor Zoom Room-https://minnstate.zoom.us/my/eprofessor
Note: if doing this assignment outside of class time, log into your personal Zoom room.
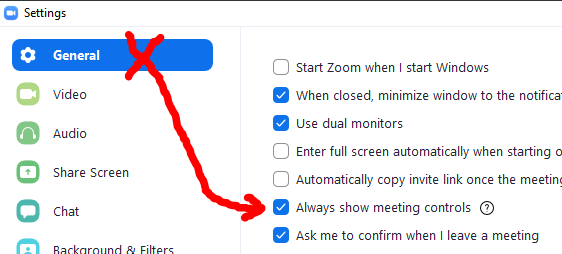
- Under Settings>General, check 'Always show meeting controls'
The meeting control toolbar will appear at the bottom of your Zoom meeting window-see screenshot in next step.
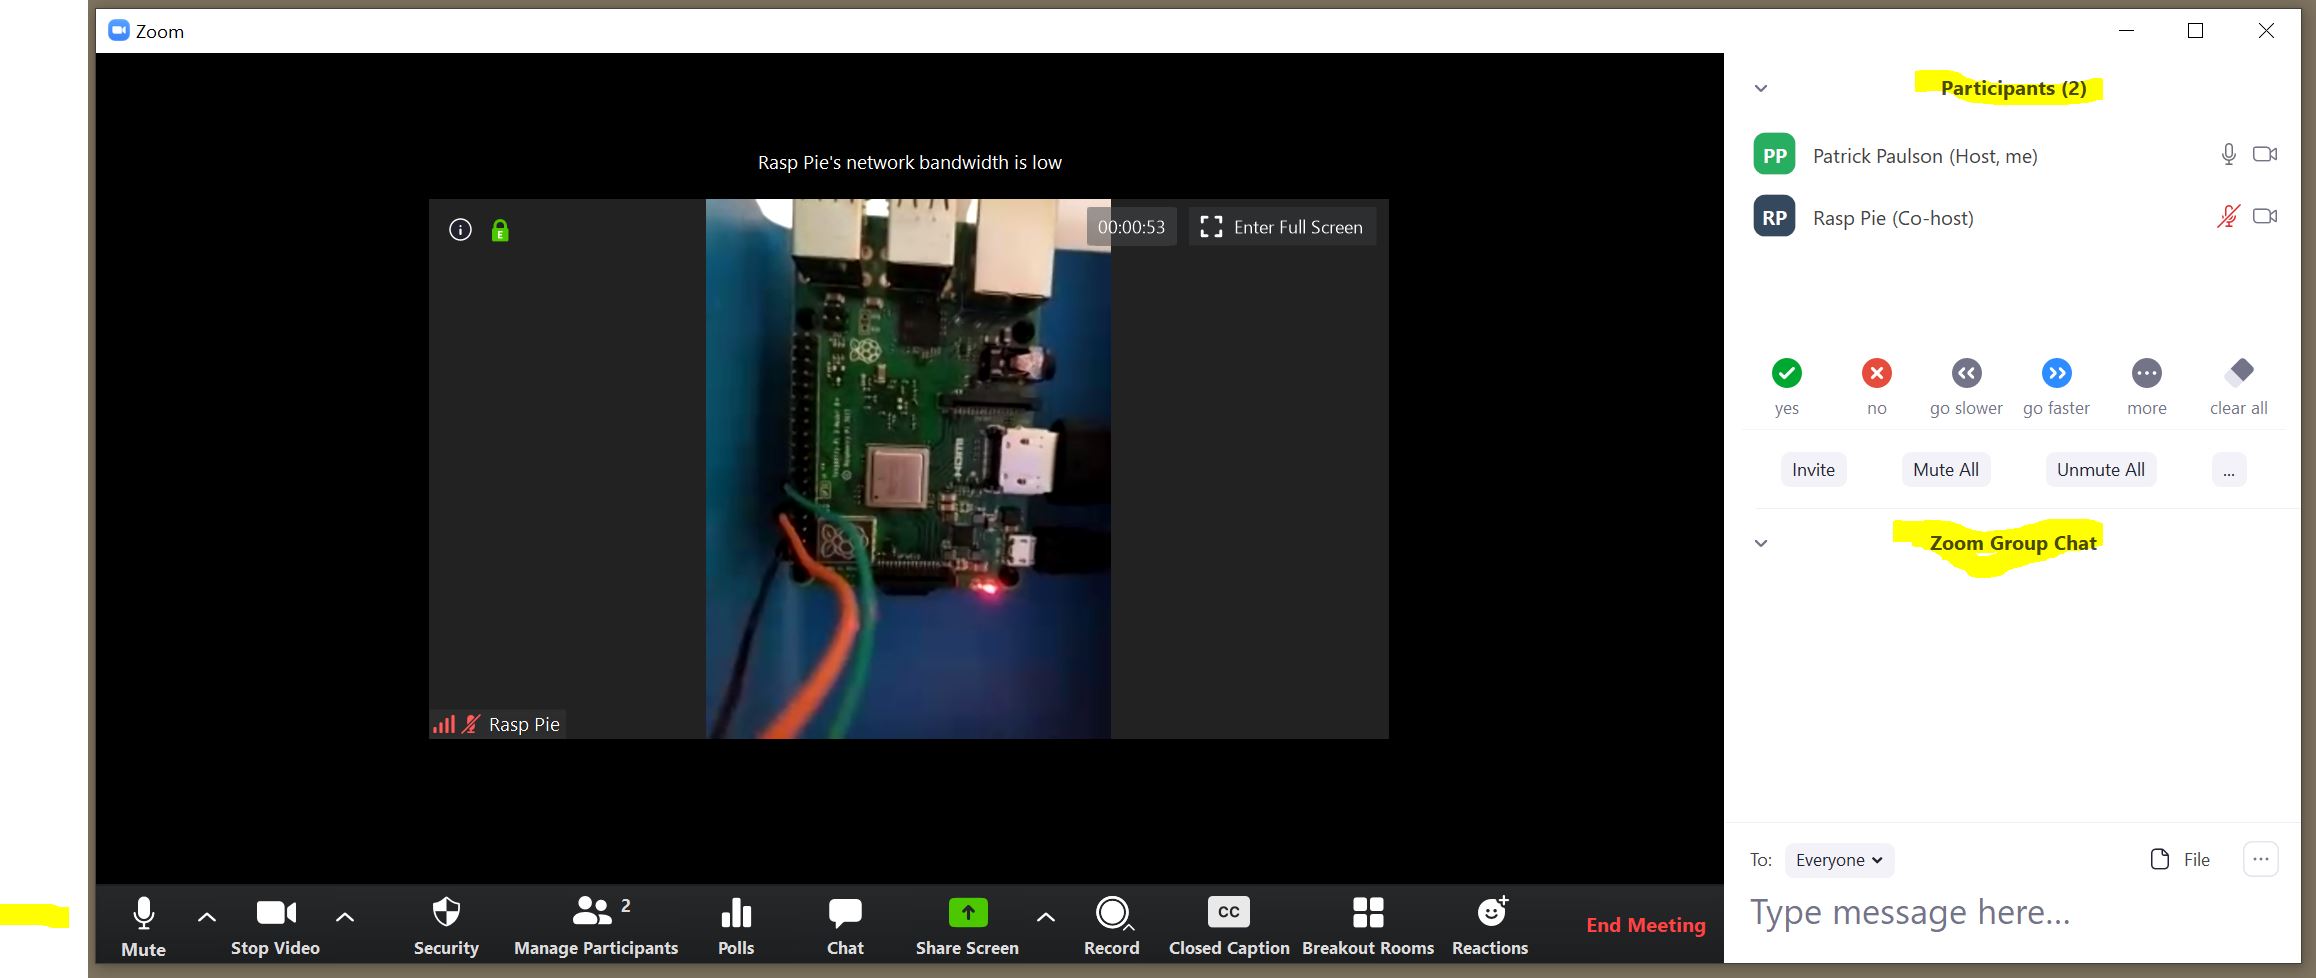
- On the meeting controls, open the Participants and Chat windows
-
To prevent audio feedback during Zoom meetings in the classroom, from the meeting controls, lower left corner, choose the Microphone drop down list, then Leave Computer Audio.
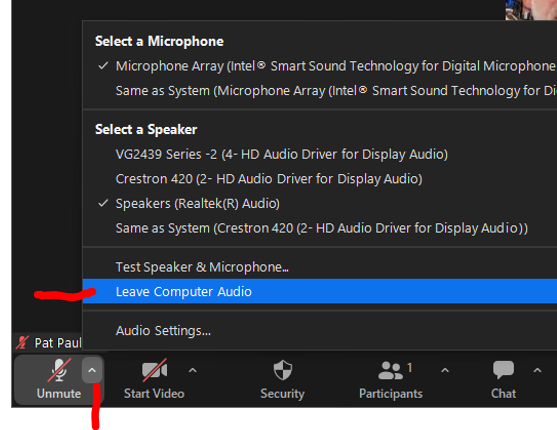
Note: if you are attending class remotely, make sure to join computer audio.
In your Zoom account, click the
'Profile' on the left side and view your profile.
Make the window big enough to view at least the information shown below.
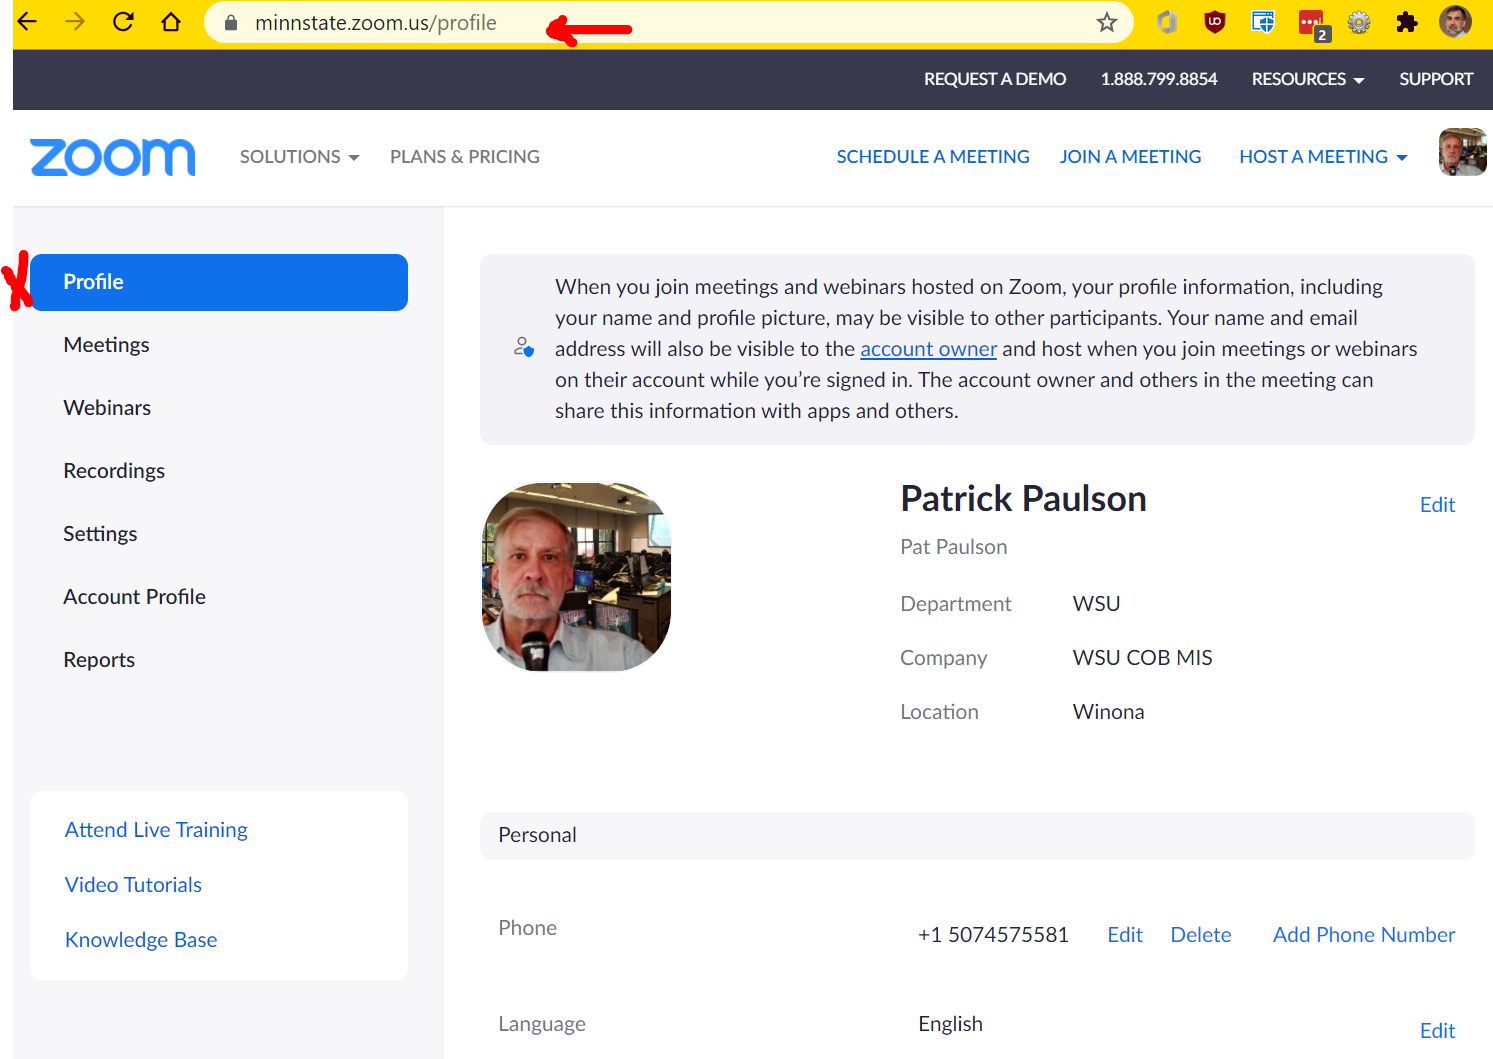
(25) 9. Use the Snipping Tool to make a screenshot of your profile.
Save the screenshot as "Ex6" in your '
Screenshot Ex6
Note-as of spring 2024 Outlook is updated, screenshots and directions below have been revised accordingly.
All course assignments are listed in the D2L calendar.
You view assignment due dates in your Outlook desktop client by subscribing to the .ics calendar feed provided by D2L.
In the first part you will obtain the .ics calendar feed from D2L.
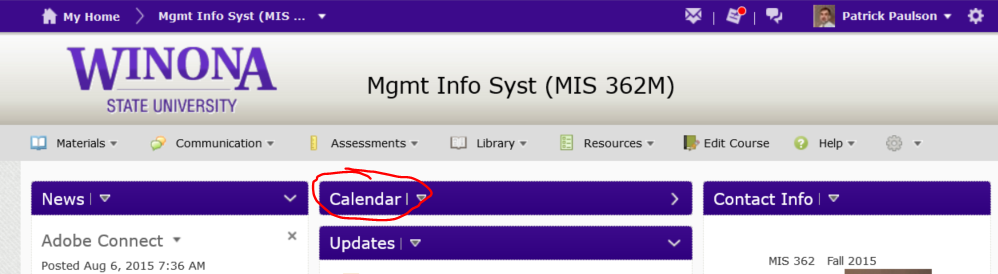
- Log into D2L and find this course.
Click on 'Calendar' or 'Materials>Calendar' from the menu.
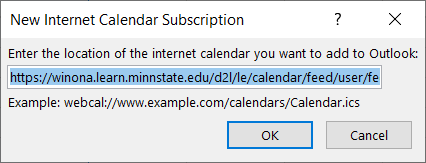
- Click on the 'Settings' icon. (also note the Subscribe icons, you will use this later)
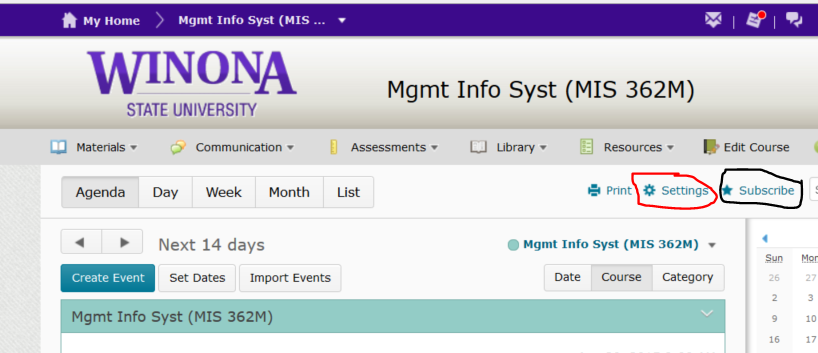
- Make sure to check 'Enable Calendar Feeds"
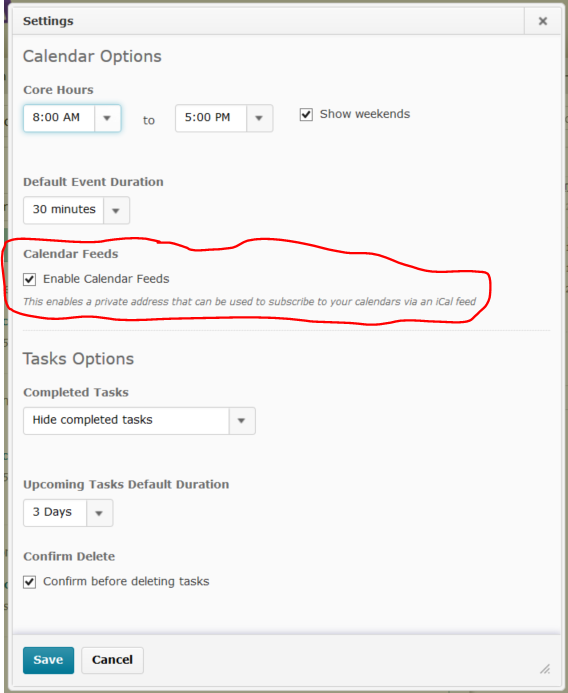
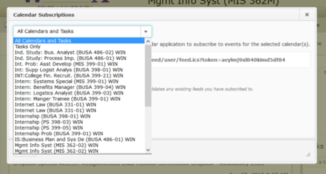
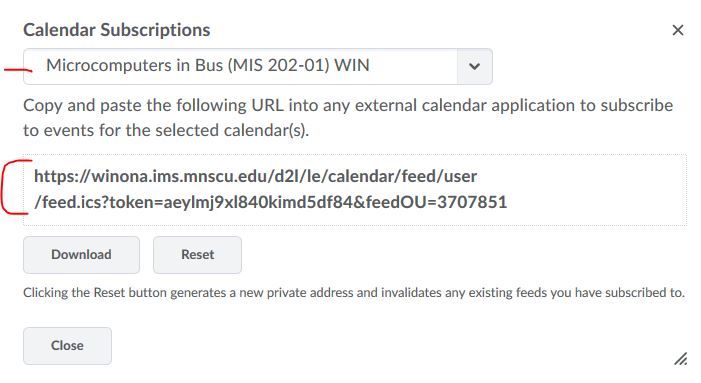
- Click the Subscribe button (see Step 2) and select your course from the list, then copy the calendar feed, and paste it into Outlook.
- In the second part you will put the calendar feed into Outlook.
Open Outlook Desktop,
click the 'Calendar' icon in the left column to display your Outlook calendar.
From the
Ribbon 'Manage Calendars' section, choose 'Add Calendar' File>Account Settings>Account Settings... When the dialog box appears choose the "Internet Calendars" tab, click "New..." Paste the D2L calendar feed url, click "Add", use the course name as the folder name, click OK, then click close.
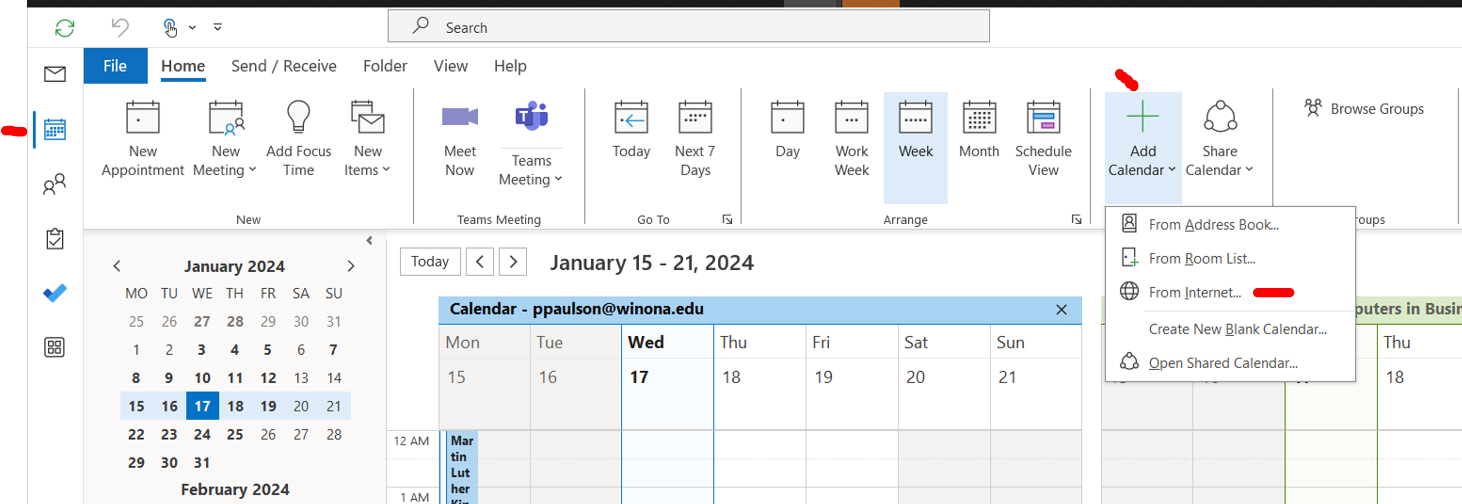
- It will take several seconds to install, then your Outlook Calendar will appear with the new calendar feed for this course.
You may need to adjust your calendar settings to view the due dates properly.
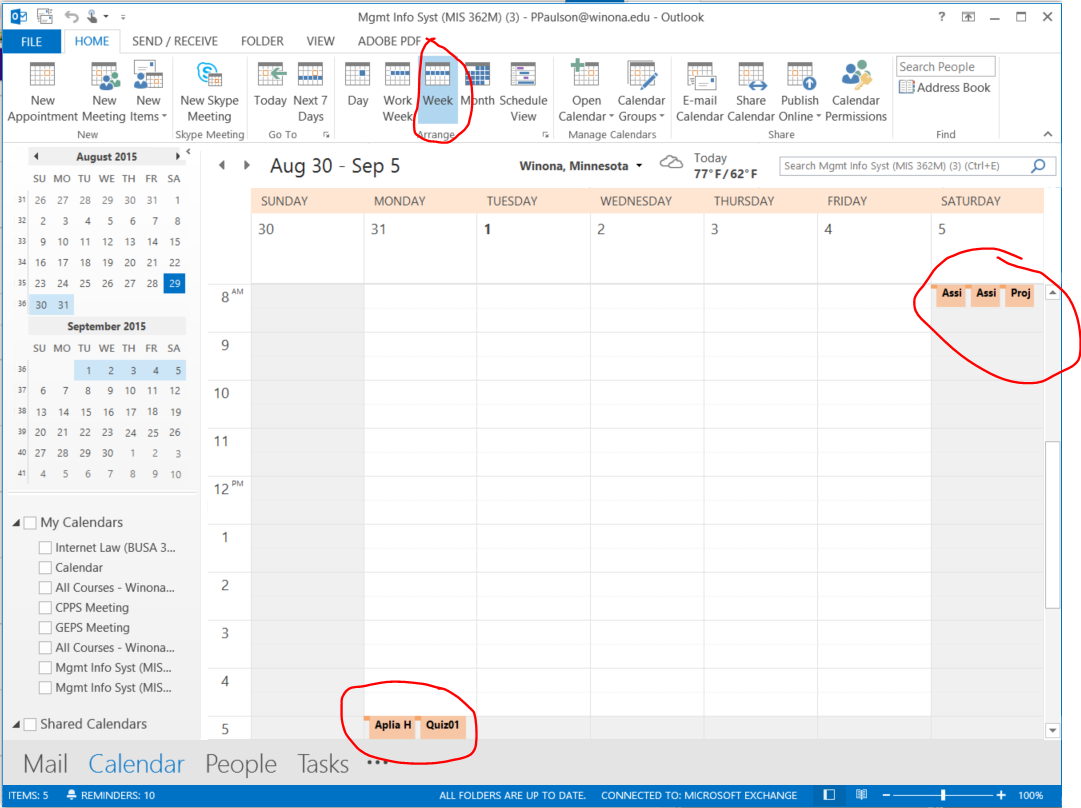
'Week' view is shown below instead of the typical 'Work Week' view so that you can see the Saturday assignment due dates.
- Repeat as desired to add calendars from other D2L courses.
You can also subscribe to calendars from your favorite sports teams, if they make the feed available.
Ref: http://www.southendzone.com/ics/
(25) 10. After installing the D2L calendar feed for this course into your Outlook desktop client, take a screenshot of this course's calendar in Outlook using the Snipping tool.
Make sure your screenshot includes your username in the Outlook title bar.
Save the screenshot as "Ex7_OutlookCalendar" as a .gif, .png or .jpg file in the same folder location as the Exercise 1 screenshot as you will be needing it later.
Screenshot Ex7
You will create one .pdf (portable document format) file from the three screenshots (Ex5, Ex6, Ex7).
PDF Screenshot Method 1
About August 2022 'Print Pictures with Microsoft Print to PDF' (Method 2, below) became unstable so this is the preferred method.
- Open a blank Word Document
- Open 'File Explorer' and navigate to the folder containing your screenshots:
- Select all the screenshot files and drag them into the Word Document
- In Word, select File>Print, then select 'Microsoft Print to PDF'
- Save the file as 'Formative00_Part1.pdf' to the folder:
PDF Screenshot Method 2
- Unstable, use with caution.
- Open File Explorer, navigate to your '
Make sure the screenshot files are properly named.
- Select all of the screenshots.
- Right Click and select 'Print' from the pop-up menu.
- In the bottom center of the 'Print Pictures' dialog box uncheck the box "Fit picture to frame"
- Click on 'Print' and save the file with the name "Formative00_Part1.pdf" in your '
- You have created a PDF file that contains all 4 screenshots. It is viewable in your Chrome browser, or using Adbobe Acrobat Reader.
Do not worry about the order of the screenshots, nor the rotation.
(25) 11. Upload your 'Formative00_Part2.pdf' file to the D2L 'Formative00_Part2' Assignment folder.
There are two ways to do this:
while you are off-campus, or
in Somsen 301, station 17, using the USB-C dock with the network patch cable designated 'HBC VPN'
If your laptop is wired to the WSU network or connected to the WSU wireless network (Warrior or Wazoo) you must first disconnect, otherwise your computer will not be able to connect to the WSU VPN.
First read (and later refer to) these instructions on connecting to the WSU VPN: https://learn.winona.edu/wiki/VPN
Note: For additional assistance, and if the above hyperlink does not work, search the WSU website for "Cisco VPN"
The following instructions are for use when in Somsen 301.
- Turn off your Wi-Fi on your laptop.
- Connect to the HBC VPN USB Type-C 3.1 cable that attaches to the HP dock
- Wait a few seconds, do a Google search to check your IP address.
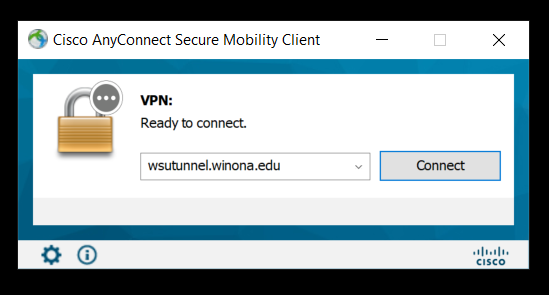
- Click the Windows button, type "Cisco AnyConnect" and press enter to bring up the login dialog box.
Note-as of October 2023 make sure 'wsutunnel.winona.edu' appears
- Click the 'Connect' button, if the Username box appears enter your StarID, enter your WSU network password; but make sure to click 'OK':
-
The first time you connect to 'wsutunnel' software is downloaded which will require you to restart your computer before continuing.
- After a few seconds the dialog box will minimize and an icon will appear in the Task Tray.

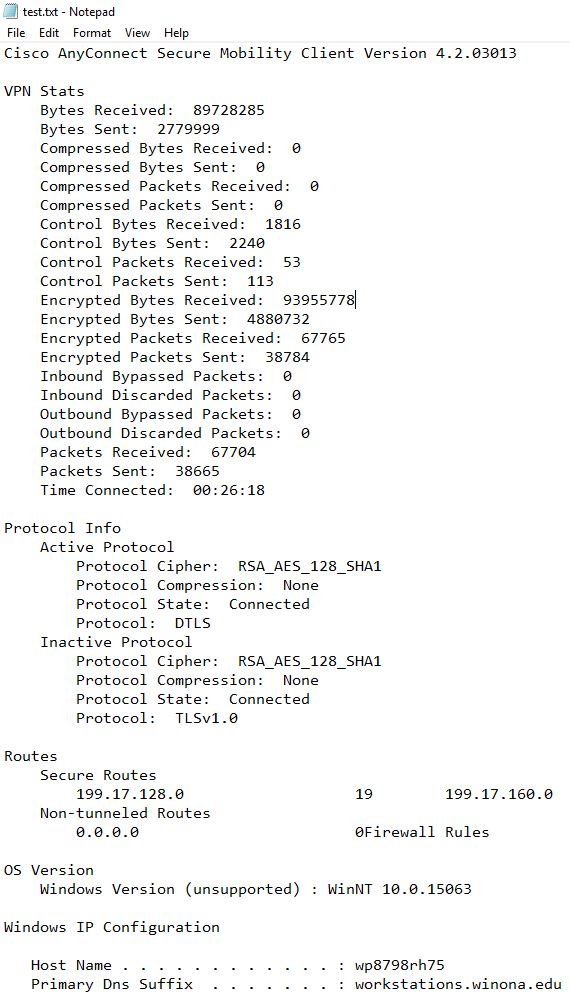
Double click it to open the dialog box. Then click the 'gear' in the lower left to show the Statistics.
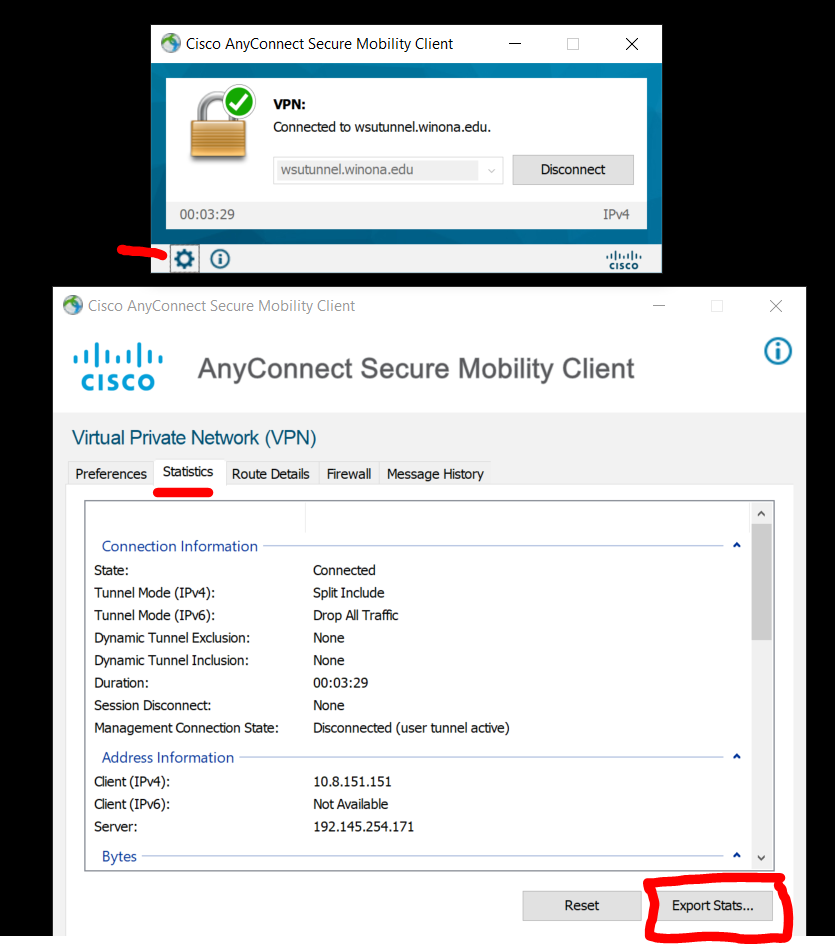
- Click the 'Export Stats...' button, save the file 'test.txt' in the folder '
- Open test.txt and print it as a pdf file named Ex8.pdf
It will look like this:
- When done, make sure to turn your computer WiFi on again.
(25) 12. Make sure to print the Cisco VPN Statistics file as 'Ex8.pdf'' and save it in the folder '
Print PDF file Ex8
To succeed in this course, and in your career, it is essential that your computer (hardware and software) is functioning correctly.
In this exercise you will perform a hardware check. At the end of Formative00, Part 3 you are advised to update your software.
Before you perform a hardware check, make sure to connect your laptop to a power supply and restart it, applying any updates.
- After your computer has restarted, click Start, type in
HP PC Hardware
Note: if not found, or to install latest version, click Start, type in "hp pc hardware diagnostics" and click 'Get' to install.
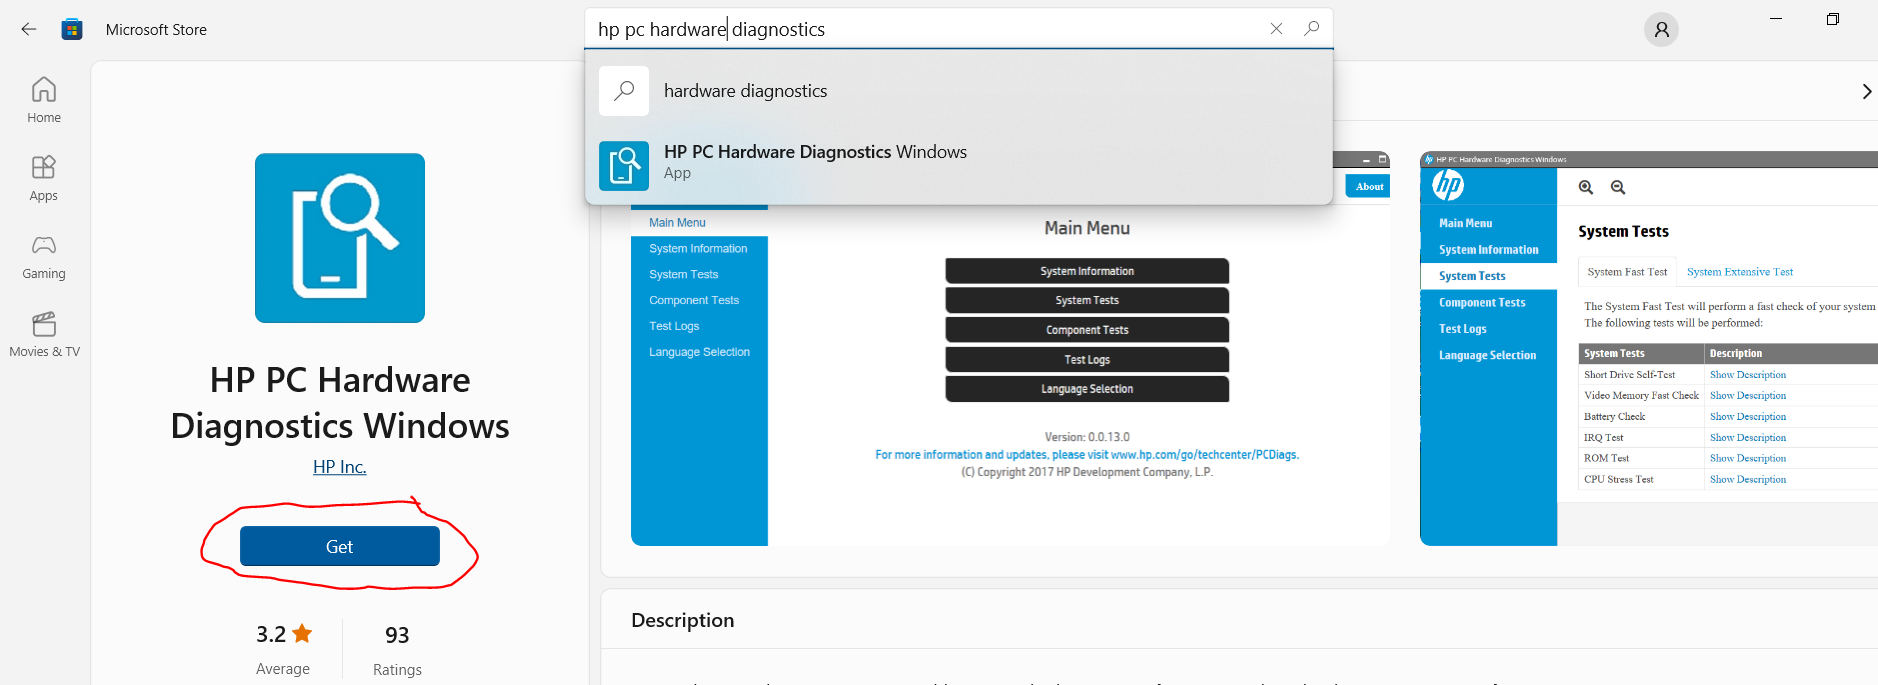 HP PC Hardware in Microsoft Store
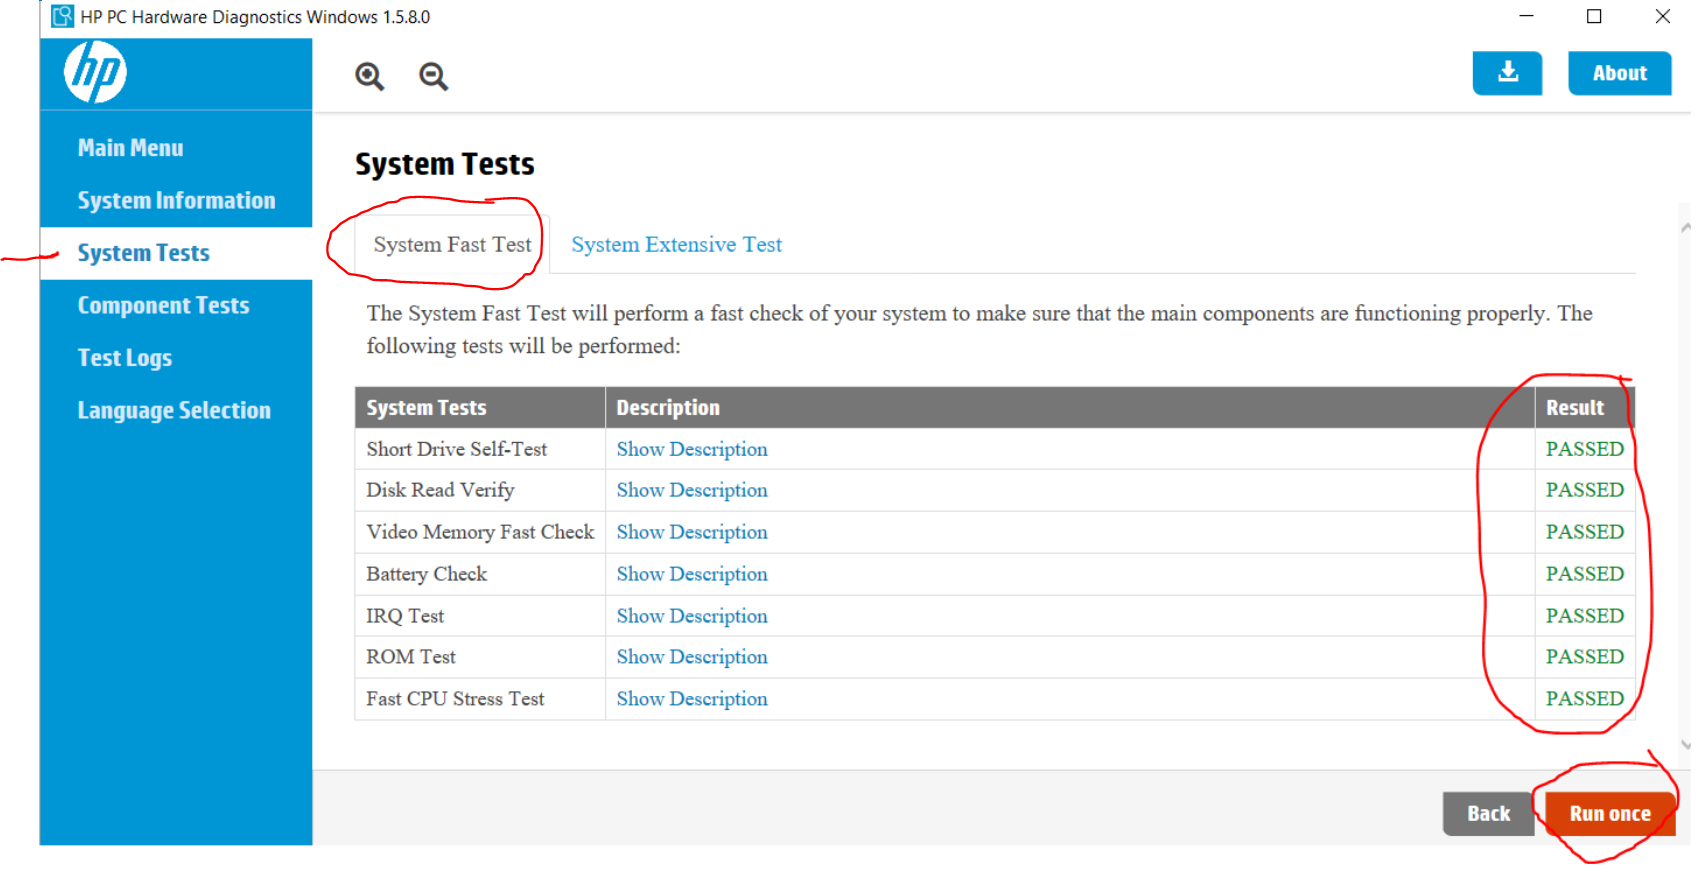
- Press Enter
- Select 'System Tests', 'System Fast Test', then click 'Run Once'
- A series of tests will check your hardware performance.
If any test fails, go to tech support in Somsen 207 for assistance in resolving the problem.
 HP PC Hardware application interface
Note- other in-depth testing and computer information is available using the HP Support Assistant.
Do not forget to check Software Center (Start, type 'Software Center') for the latest Windows and other updates.
(25) 13. Use the Snipping Tool to make a screenshot of the 'HP PC Hardware Diagnostics Window' showing that your laptop 'Passed' ALL tests.
Save the screenshot as "Ex9" in your '
' folder.
It can be either a .jpg or .png file.
Screenshot Ex9
Publications:
To keep informed, you are strongly encouraged to read the many magazines available to you at no charge through Flipster.
Through the Krueger Library, you have access to online versions of The New York Times, The Wall Street Journal, and Flipster magazines.
Instructions are below. If you have questions, please contact the Krueger Library.
New York Times:
1) Click on this link: https://libguides.winona.edu/az.php?a=n
2)
From the list choose “New York Times (Institutional Subscription)”
3) For your username, use your StarID@winona.edu. Then choose a password and indicate that you are “Student”. Choose your graduation year.
4) You may also have access to the NYT app through WSU Apps.
*To subscribe, you must sign up on campus.*
(25) 14. After subscriping to the New York Times, login and take a screenshot of the current edition's home page using the Snipping tool.
Save the screenshot as "Ex10" in your '
Screenshot Ex10NYT
Wall Street Journal
1) Click on this link: Wall Street Journal and search for 'Wall Street Journal', follow the instructions.
2) Enter your StarID and the password associated with your StarID
3) Follow the instructions and fill out the subscription form
4) Users with an existing account have the option to connect to the institutional subscription at the bottom of the “Create Account” page.
5) Repeat these steps every 180 days.
You may also have access to the WSJ app through WSU Apps.
(25) 15. After subscribing to the Wall Street Journal, login and take a screenshot of the front page using the Snipping tool.
Save the screenshot as "Ex10WSJ" in your '
Screenshot Ex10WSJ
The Krueger Library now has access to many popular titles (Business Week, Fast Company, Time, Newsweek, Entrepreneur and many more) on your laptop or iPad! To learn how to access these, please consult this library guide.
https://libguides.winona.edu/c.php?g=611626&p=4247234
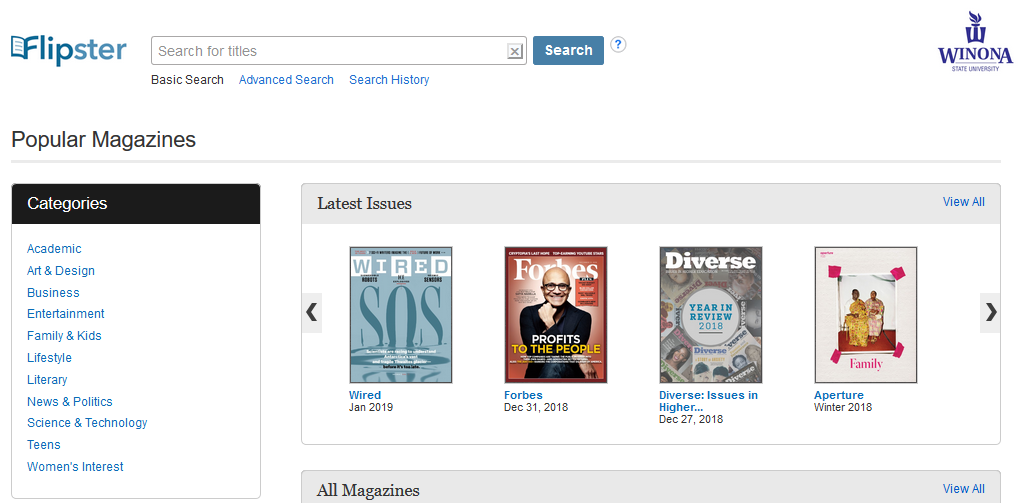
(25) 16. After accessing Flipster, open the latest issue of Wired magazine and take a screenshot of the cover using the Snipping tool.
Save the screenshot as "Ex10Flip" in your '
Screenshot Ex10Flip
You will be creating one .pdf (portable document format) file from the screenshots that you have taken (Ex9, EX10NYT, EX10WSJ, Ex10Flip), and the pdf that you have printed from the VPN log file.
PDF Screenshot Method 1
About August 2022 'Print Pictures with Microsoft Print to PDF' (Method 2, below) became unstable so this is the preferred method.
- Open a blank Word Document
- Open 'File Explorer' and navigate to the folder containing your screenshots:
- Select all the screenshot files and drag them into the Word Document
- In Word, select File>Print, then select 'Microsoft Print to PDF'
- Save the file as 'Screenshots.pdf' to the folder:
PDF Screenshot Method 2
- Unstable, use with caution.
- Open File Explorer, navigate to your '
Make sure the screenshot files are properly named.
- Select all of the screenshots.
- Right Click and select 'Print' from the pop-up menu.
- In the bottom center of the 'Print Pictures' dialog box uncheck the box "Fit picture to frame"
- Click on 'Print' and save the file with the name "Screenshots.pdf" in your '
- You have created a PDF file that contains all 4 screenshots. It is viewable in your Chrome browser, or using Adbobe Acrobat Reader.
Do not worry about the order of the screenshots, nor the rotation.
Combine Screenshots using PDFill
Use PDFill (installed in Exercise 4) to merge the ScreenShots.pdf file with the Ex8.pdf file created in Exercise 8.
Save this combined file as 'Formative00_Part3.pdf' in your '
(25) 17. Upload your 'Formative00_Part3.pdf' file to the D2L 'Formative00_Part3' Assignment folder.
Composing and sending clear, professional emails is an important skill to learn and master for your career.
Google 'composing effective emails' and read some of the tips provided, such as these 10 tips found at the Seton Hill website.
For this Exercise
and send a professional email to Professor Paulson stating that you have completed Exercise 11 of Assignment Formative00.
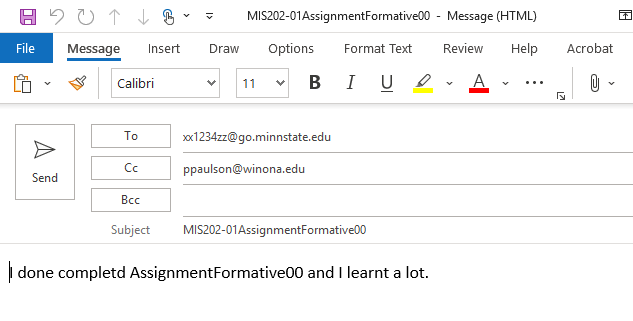
Make sure to:
- Use the skills you learned to edit the email.
- Ensure the email has a professional tone.
- Proofread the email, check your grammar and correct any typographic errors.
- Do not change the email subject line!
(25) 18. When your email is ready, click the Send button.
After sending the email check your Outlook account to confirm that you have received a copy of this email.
If you did not receive a confirming email, something is wrong, and you need to troubleshoot and resolve the problem.
Most assignments require you to submit your name, course information and answer's to Professor Paulson's web database.
Doing this allows you and the professor to view a summary of your answers after you have created your website in the next few classes.
(50) 19. Press the 'SUBMIT' button below, and read the instructions on the confirmation page.
Make sure to verify that you also received the confirmation email. If not, it is time to begin troubleshooting.
After completing the submission process, return to this page to complete the software update exercise below.
It is important to keep your laptop software and drivers up to date to minimize computer problems.
Two items are very important in this regard.
First- make sure to apply updates and restart your computer on campus while connected to the HP USB-C dock in Somsen 301.
Make sure you see both the power and wired network connection icons in the Task Tray.
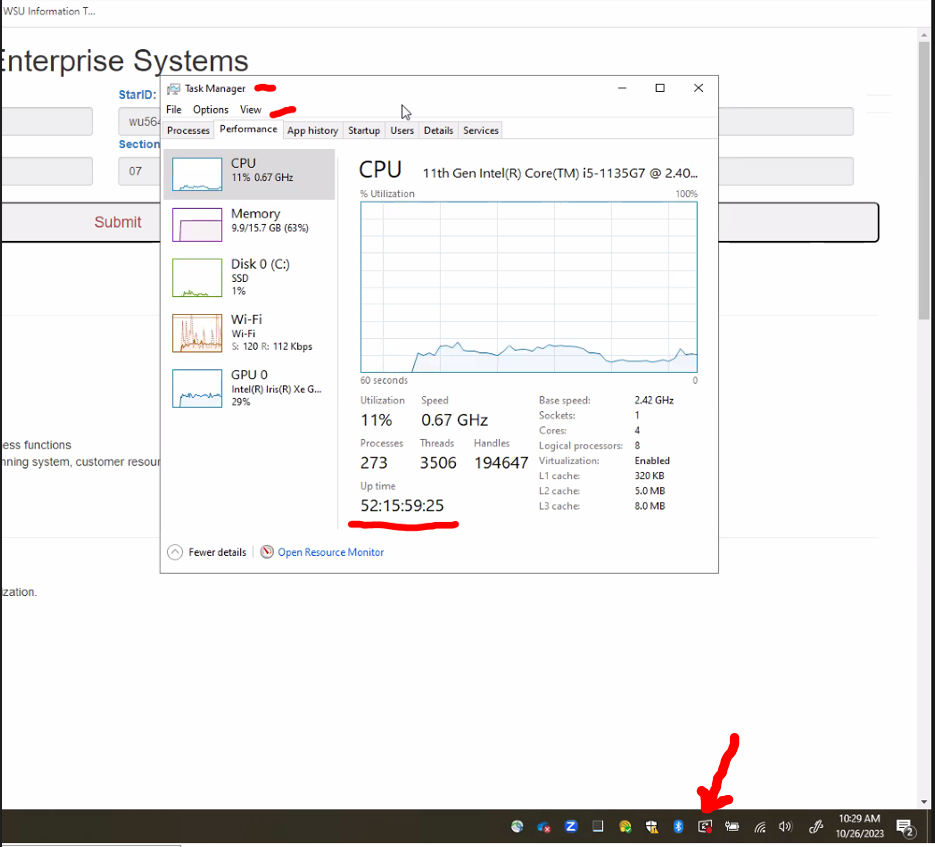
52 Days Since Reboot!
Red Dot in Task Tray is Dire Warning!
Update!!!!
Second- at least once a semester use the HP Image Assistant to update software, firmware, BIOS and other items (see instructions below).
- Click this hyperlink: HPIA client
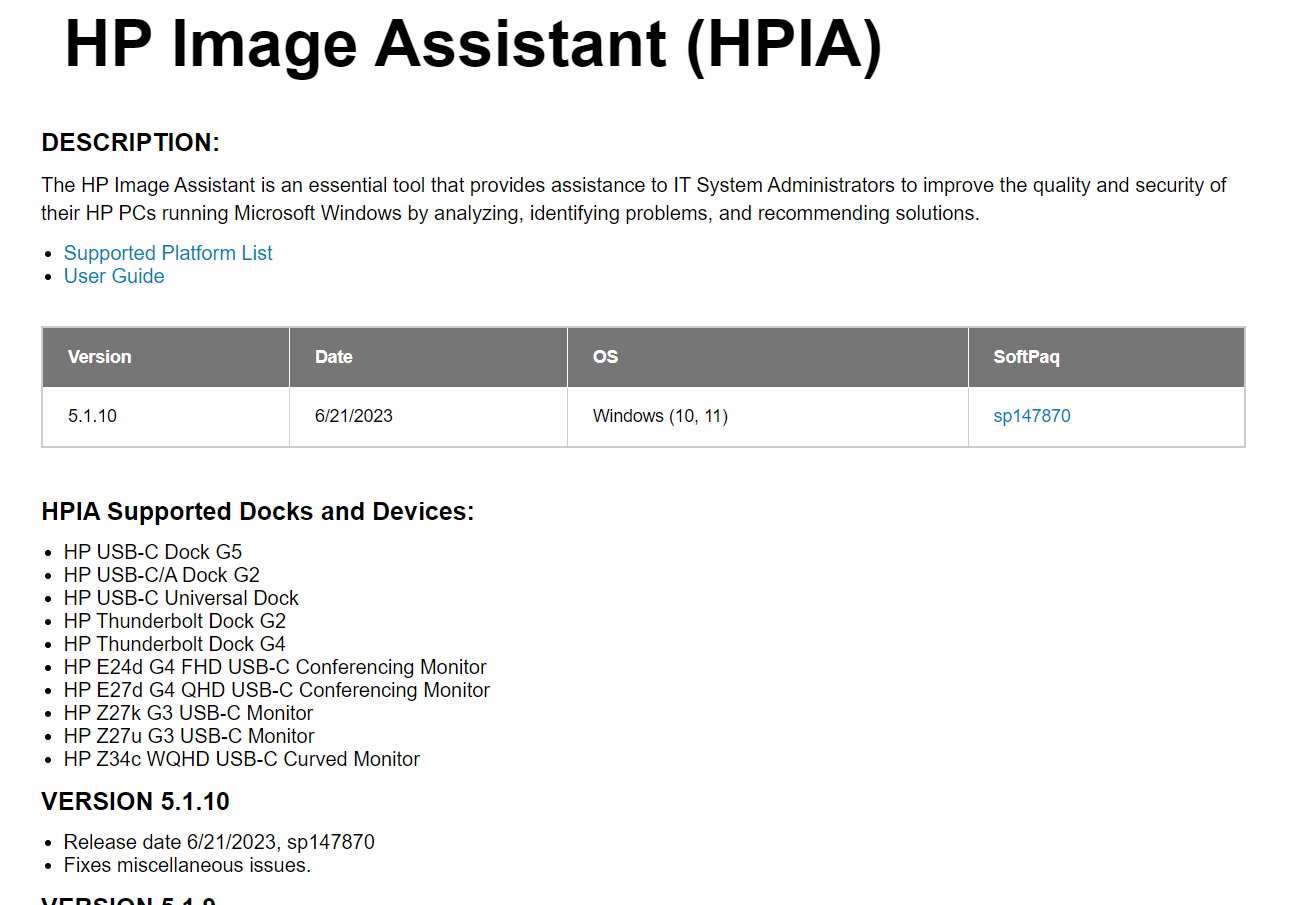
Installing HPIA
- After installation, run the program-it will update your computer bios, drivers and firmware. Then reboot/restart. Depending on how much updating is required, this could take some time (more than 30 minutes).
Note: if the process has not completed after 90 minutes, please reboot/restart your laptop.